Get ready to dive into the world of motorcycle maintenance with our comprehensive guide to Yamaha R6 parts diagrams. Whether you’re a seasoned mechanic or a DIY enthusiast, this guide will equip you with the knowledge and tools to navigate the intricate workings of your Yamaha R6 with ease.
From identifying specific parts to troubleshooting complex issues, a Yamaha R6 parts diagram is your secret weapon for keeping your ride in tip-top shape. Join us as we explore the ins and outs of these essential diagrams, empowering you to become a master of your own motorcycle.
Yamaha R6 Parts Diagram

The Yamaha R6 is a popular sport bike known for its performance and handling. A Yamaha R6 parts diagram is an essential tool for anyone who wants to maintain or repair their R6. It provides a detailed view of all the parts of the bike, making it easy to identify and order the parts you need.
Yamaha R6 parts diagrams are typically divided into several sections, including the engine, chassis, electrical system, and bodywork. Each section contains a detailed diagram of the parts in that section, along with part numbers and descriptions.
Types of Parts Diagrams
There are several different types of Yamaha R6 parts diagrams available. The most common type is the exploded view diagram. This type of diagram shows all of the parts of the bike in a three-dimensional view, making it easy to see how the parts fit together.
The Yamaha R6 is a popular motorcycle, and its parts diagram can be found online. If you’re looking for handlebar grips for your R6, you can find a variety of options at car-tuneup.com . The site has a wide selection of grips in different styles and colors, so you’re sure to find the perfect ones for your bike.
Once you’ve found the grips you want, you can order them online and have them shipped right to your door. It’s that easy to get your R6 looking and feeling its best.
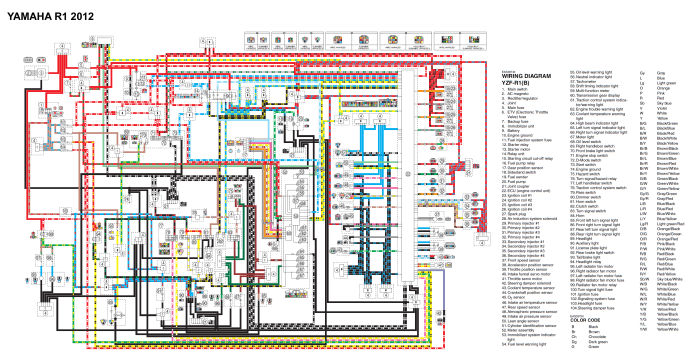
Another type of parts diagram is the schematic diagram. This type of diagram shows the electrical system of the bike, making it easy to troubleshoot electrical problems.
Using a Yamaha R6 Parts Diagram
Yamaha R6 parts diagrams provide a comprehensive visual representation of the motorcycle’s components and their assembly. Understanding how to use these diagrams is essential for identifying and locating specific parts.
R6 parts diagrams are typically organized into sections based on the motorcycle’s major components, such as the engine, chassis, and electrical system. Each section contains a detailed exploded view of the respective components, with each part labeled and identified.
Yamaha R6 is a high-performance motorcycle known for its power and speed. If you’re looking for a detailed diagram of the Yamaha R6, you can find it online or in the owner’s manual. The diagram will show you all the parts of the motorcycle, including the engine, transmission, and suspension.
To learn more about the Yamaha R6’s impressive power, check out yamaha r6 power . The article provides insights into the R6’s engine specifications, horsepower, and torque figures, giving you a better understanding of its performance capabilities. Once you’ve familiarized yourself with the power of the R6, you can return to the parts diagram to see how these components work together to deliver an exhilarating riding experience.
Finding Specific Parts
To find a specific part, refer to the index or table of contents provided with the diagram. This index lists all the parts included in the diagram and their corresponding reference numbers. Once you have identified the reference number for the desired part, locate it on the diagram and follow the lines connecting the part to its surrounding components.
Interpreting Symbols and Abbreviations
Parts diagrams often use symbols and abbreviations to convey additional information. Common symbols include circles to indicate fasteners, arrows to indicate direction, and dashed lines to represent electrical connections. Abbreviations may include “OE” for original equipment, “R” for right-hand side, and “L” for left-hand side.
Benefits of Using a Yamaha R6 Parts Diagram
A Yamaha R6 parts diagram is an invaluable tool for anyone who owns and maintains a Yamaha R6 motorcycle. It provides a detailed and accurate representation of all the parts that make up the motorcycle, making it easier to identify and locate specific components when performing maintenance or repairs.
Saving Time and Money
One of the biggest benefits of using a parts diagram is that it can save you time and money. When you’re working on your motorcycle, it’s important to be able to quickly and easily identify the parts you need to replace or repair.
A parts diagram can help you do this by providing a visual representation of all the parts, making it easy to find the one you’re looking for.
In addition, a parts diagram can help you save money by preventing you from buying unnecessary parts. If you’re not sure which part you need, you can consult the parts diagram to identify the correct one. This can help you avoid buying the wrong part, which can save you both time and money.
Troubleshooting and Diagnosing Problems
A parts diagram can also be helpful for troubleshooting and diagnosing problems with your motorcycle. If you’re experiencing a problem with your motorcycle, you can use the parts diagram to identify the parts that are most likely to be causing the problem.
Yamaha R6 parts diagrams can help you visualize the intricate assembly of this high-performance motorcycle. If you’re specifically looking for the headlight bulb, check out this detailed guide on yamaha r6 headlight bulb . It provides clear instructions and diagrams to help you replace or upgrade your headlight bulb with ease.
Refer to the Yamaha R6 parts diagram to locate the headlight assembly and follow the steps outlined in the guide to ensure a proper installation.
This can help you narrow down the list of possible causes and make it easier to diagnose the problem.
In addition, a parts diagram can help you identify the correct replacement parts for your motorcycle. If you’re replacing a part, it’s important to make sure that you’re getting the right part for your specific motorcycle model. A parts diagram can help you identify the correct part by providing a detailed and accurate representation of all the parts that make up your motorcycle.
Finding a Yamaha R6 Parts Diagram
Finding a Yamaha R6 parts diagram is essential for accurate part identification and ordering. There are several sources available both online and offline, but it’s important to consider factors like accuracy, completeness, and ease of use when choosing a diagram.
Online Sources, Yamaha r6 parts diagram
The internet offers a wide range of Yamaha R6 parts diagrams. Some popular sources include:
- Yamaha Motor Corporation website: The official Yamaha website provides comprehensive parts diagrams for all Yamaha models, including the R6.
- OEM parts websites: These websites specialize in providing original equipment manufacturer (OEM) parts and diagrams for various vehicles, including motorcycles.
- Motorcycle forums and communities: Online forums and communities dedicated to Yamaha R6 often have shared resources, including parts diagrams.
Offline Sources
If you prefer physical copies, you can find Yamaha R6 parts diagrams at:
- Yamaha dealerships: Authorized Yamaha dealerships can provide you with printed parts diagrams for your specific R6 model.
- Motorcycle parts stores: Many motorcycle parts stores carry printed or digital parts diagrams for various makes and models.
Importance of Accuracy
Using an accurate and up-to-date parts diagram is crucial because:
- Correct part identification: An accurate diagram ensures that you identify the correct parts for your specific R6 model and year.
- Avoid ordering errors: Using an outdated or inaccurate diagram can lead to ordering incorrect parts, resulting in wasted time and money.
- Proper assembly and maintenance: A detailed and up-to-date parts diagram provides valuable guidance for assembly, disassembly, and maintenance tasks.
Alternative Methods for Identifying Yamaha R6 Parts
In addition to using a Yamaha R6 parts diagram, there are other methods you can use to identify the parts you need. These include using a parts catalog or contacting a Yamaha dealer.
Using a Parts Catalog
A parts catalog is a comprehensive listing of all the parts available for a particular motorcycle model. It includes detailed diagrams and part numbers, making it easy to find the specific parts you need.
Advantages:
- Provides a comprehensive listing of all available parts
- Includes detailed diagrams and part numbers
- Can be used to order parts online or from a Yamaha dealer
Disadvantages:
- Can be difficult to find the specific parts you need if you don’t know the part number
- May not be available for all motorcycle models
Contacting a Yamaha Dealer
Another option for identifying Yamaha R6 parts is to contact a Yamaha dealer. A Yamaha dealer will have access to a parts catalog and can help you find the specific parts you need. They can also order parts for you and provide you with installation advice.
Advantages:
- Can help you find the specific parts you need
- Can order parts for you
- Can provide you with installation advice
Disadvantages:
- May not be able to help you if you don’t know the part number
- May charge a fee for their services
The following table compares the different methods for identifying Yamaha R6 parts:
| Method | Advantages | Disadvantages |
|---|---|---|
| Using a Yamaha R6 parts diagram | Easy to use | May not be available for all motorcycle models |
| Using a parts catalog | Provides a comprehensive listing of all available parts | Can be difficult to find the specific parts you need if you don’t know the part number |
| Contacting a Yamaha dealer | Can help you find the specific parts you need | May not be able to help you if you don’t know the part number |
Additional Resources
To further enhance your understanding of Yamaha R6 parts diagrams, consider exploring the following resources:
Online Forums
Online forums dedicated to Yamaha R6 motorcycles provide a wealth of knowledge and support from fellow riders and enthusiasts. Engage in discussions, ask questions, and share your experiences to gain valuable insights and perspectives.
Technical Manuals
Yamaha’s official technical manuals provide comprehensive information on the R6’s components, assembly, and maintenance procedures. Refer to these manuals for detailed technical specifications and troubleshooting guidance.
Staying Informed
It’s crucial to stay updated on the latest changes and updates to Yamaha R6 parts diagrams. Check Yamaha’s official website or subscribe to relevant newsletters to receive notifications of any modifications or revisions.
Outcome Summary
Now that you’ve gained a deep understanding of Yamaha R6 parts diagrams, you’re well on your way to becoming an expert in motorcycle maintenance. Remember to always refer to the most up-to-date diagrams and consult with qualified professionals when necessary.
With the knowledge you’ve acquired, you can tackle any repair or maintenance task with confidence, ensuring your Yamaha R6 runs smoothly for years to come.

1 thought on “Yamaha R6 Parts Diagram: Your Guide to Motorcycle Maintenance”