Embark on a journey into the realm of Yamaha R6 neutral switches, where we’ll uncover their significance, delve into troubleshooting techniques, and provide a step-by-step guide to replacement. Hold on tight as we navigate the ins and outs of this crucial component.
Neutral switches play a pivotal role in ensuring smooth gear transitions and preventing unintended engine starts. Understanding their operation and maintenance is paramount for every R6 rider. So, buckle up and let’s dive right in!
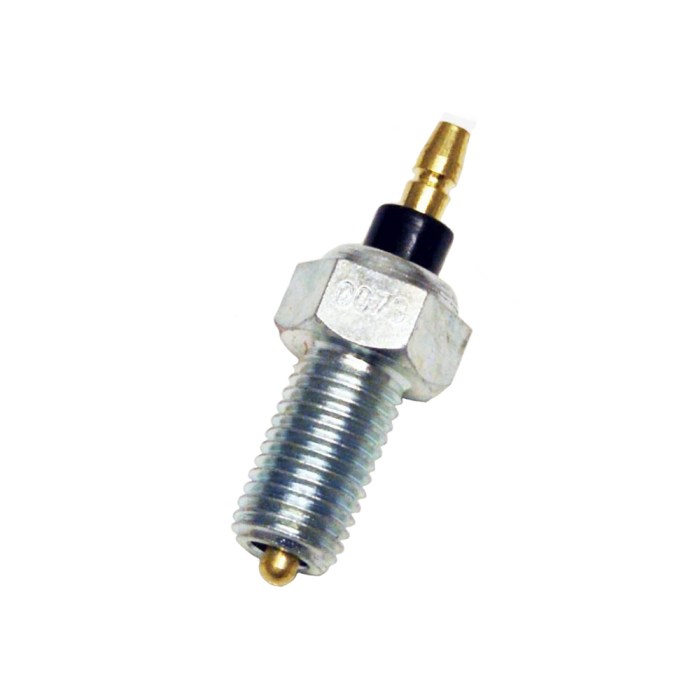
Yamaha R6 Neutral Switch Overview
The neutral switch in a Yamaha R6 motorcycle is a crucial component that plays a vital role in the overall functionality of the bike. Its primary purpose is to detect when the transmission is in neutral, allowing the rider to start the engine and engage the starter motor.
The neutral switch is typically located on the left side of the engine, near the transmission. It consists of a small switch that is activated by a plunger when the transmission is shifted into neutral. When the switch is activated, it completes an electrical circuit that allows the starter motor to engage and the engine to start.
Common Issues and Symptoms
A faulty neutral switch can lead to a variety of issues, including:
- Difficulty starting the engine
- Engine stalling when shifted into neutral
- Neutral light not illuminating on the instrument panel
If you are experiencing any of these issues, it is important to have the neutral switch checked by a qualified mechanic.
If you’re having trouble with your Yamaha R6 neutral switch, don’t forget to check the condition of your Yamaha R6 handlebar grips . Worn or damaged grips can interfere with the switch’s operation, causing it to malfunction. Replacing the grips with new ones can often resolve the issue and restore proper functionality to the neutral switch.
Neutral Switch Testing and Troubleshooting

Identifying and resolving issues with the neutral switch is crucial for ensuring smooth and reliable operation of your Yamaha R6. This section provides step-by-step guidance on testing and troubleshooting the neutral switch, empowering you to diagnose and rectify any problems efficiently.
Neutral Switch Testing
To test the neutral switch, you’ll need a multimeter set to the ohms (Ω) or continuity setting. Follow these steps:
- Locate the neutral switch, usually found on the left side of the engine near the clutch lever.
- Disconnect the electrical connector from the neutral switch.
- Set the multimeter to the ohms or continuity setting.
- Touch one probe of the multimeter to the terminal on the switch connector that corresponds to the neutral wire (typically green or black).
- Touch the other probe to the ground terminal on the switch connector (typically black or brown).
Interpreting Test Results, Yamaha r6 neutral switch
- Zero ohms or continuity:The neutral switch is closed (ON) when the transmission is in neutral.
- Infinite ohms or no continuity:The neutral switch is open (OFF) when the transmission is not in neutral.
If the test results do not match these expected values, the neutral switch may be faulty and need to be replaced.
If your Yamaha R6 neutral switch is giving you trouble, it’s important to know how many cubic centimeters (cc) your bike has. The Yamaha R6 has a 599 cc engine , which is a good size for a sportbike. Knowing the cc of your bike can help you troubleshoot problems with the neutral switch and other components.
Troubleshooting Tips
- Check electrical connections:Ensure the electrical connector to the neutral switch is properly connected and free of corrosion or damage.
- Inspect neutral switch wiring:Look for any breaks, shorts, or loose connections in the wiring harness connected to the neutral switch.
- Test neutral switch actuator:The neutral switch actuator is a small plunger that moves when the transmission is shifted into neutral. Check if the actuator is moving freely and not binding or sticking.
- Replace neutral switch:If all other troubleshooting steps fail, it may be necessary to replace the neutral switch with a new one.
Neutral Switch Replacement Procedures: Yamaha R6 Neutral Switch
Replacing the neutral switch on a Yamaha R6 is a relatively straightforward process that can be completed in under an hour. However, it is important to take safety precautions and have the necessary tools before beginning.
Safety Precautions:
If you’re having trouble finding the neutral switch on your Yamaha R6, don’t despair. It’s actually quite easy to locate. Just follow these simple steps. First, check out this awesome yamaha r6 negra . Now, back to the neutral switch.
It’s located on the left side of the engine, just below the clutch lever. It’s a small, black switch with two wires coming out of it. Once you’ve found it, you can simply unplug the wires and remove the switch.
- Disconnect the negative terminal of the battery before starting any work.
- Allow the engine to cool completely before touching any components.
- Wear safety glasses and gloves to protect yourself from sharp edges and fluids.
Necessary Tools:
- 10mm socket wrench
- 12mm socket wrench
- Flat head screwdriver
- New neutral switch
li>Phillips head screwdriver
Step 1: Remove the Fairings
To access the neutral switch, you will need to remove the left-hand side fairings. Start by removing the screws that hold the upper fairing in place, then carefully lift the fairing off.
Step 2: Locate the Neutral Switch
The neutral switch is located on the left side of the engine, just below the clutch lever. It is a small, black switch with two wires connected to it.
Step 3: Disconnect the Wires
Use a 10mm socket wrench to disconnect the two wires from the neutral switch. Be careful not to damage the wires.
Step 4: Remove the Neutral Switch
Use a 12mm socket wrench to remove the bolt that holds the neutral switch in place. Once the bolt is removed, you can carefully pull the neutral switch out of its housing.
Step 5: Install the New Neutral Switch
Insert the new neutral switch into its housing and tighten the bolt. Be sure to torque the bolt to the correct specifications.
Step 6: Connect the Wires
Use a 10mm socket wrench to connect the two wires to the neutral switch. Be sure to connect the wires to the correct terminals.
Step 7: Reinstall the Fairings
Carefully replace the left-hand side fairings. Be sure to tighten the screws securely.
Step 8: Test the Neutral Switch
Reconnect the negative terminal of the battery and start the motorcycle. Shift the motorcycle into neutral and check if the neutral light comes on. If the neutral light does not come on, the neutral switch may need to be adjusted or replaced.
Neutral Switch Maintenance and Prevention
Regular maintenance of the neutral switch is crucial to ensure its proper functioning and prevent premature failure. Neglecting maintenance can lead to various issues, such as difficulty starting the motorcycle, false neutral indications, or even safety hazards.
Preventative Measures
- Regular Cleaning:Periodically clean the neutral switch and its surroundings to remove dirt, debris, or corrosion that can interfere with its operation.
- Inspect Wiring:Check the electrical wiring connected to the neutral switch for any damage or loose connections that could cause malfunctions.
- Proper Adjustment:Ensure that the neutral switch is properly adjusted according to the manufacturer’s specifications. Incorrect adjustment can lead to false neutral indications or starting issues.
Consequences of Neglect
Neglecting neutral switch maintenance can have several consequences:
- Starting Problems:A faulty neutral switch can prevent the motorcycle from starting or cause intermittent starting issues.
- False Neutral Indications:A malfunctioning neutral switch may provide false neutral indications, leading to confusion or potential accidents.
- Safety Hazards:In certain situations, a faulty neutral switch can pose safety hazards, such as unintended gear engagement while the motorcycle is running.
Compatibility and Interchangeability
Ensuring compatibility and understanding interchangeability is crucial for selecting the correct neutral switch for your Yamaha R6.
Yamaha has made specific neutral switches for different R6 models and years. Interchangeability between models may be limited, and using an incompatible switch can lead to issues.
Compatible Neutral Switches
Here’s a table listing compatible neutral switch part numbers for various Yamaha R6 models and years:
| Model | Years | Part Number |
|---|---|---|
| YZF-R6 | 2006-2009 | 3D8-82540-00-00 |
| YZF-R6S | 2006-2009 | 3D8-82540-00-00 |
| YZF-R6 | 2010-2016 | 5SL-82540-00-00 |
| YZF-R6S | 2010-2016 | 5SL-82540-00-00 |
Concluding Remarks
With this comprehensive guide, you’re now equipped with the knowledge and skills to tackle Yamaha R6 neutral switch issues with confidence. Remember, regular maintenance and prompt troubleshooting can extend the lifespan of your switch, ensuring a seamless and enjoyable riding experience.
Ride safe and keep your R6 purring smoothly!

1 thought on “Yamaha R6 Neutral Switch: Comprehensive Guide to Function, Troubleshooting, and Replacement”